
Fixing TortoiseGit Authentication Errors: How to Clear Saved Authentication Data
Summary: A walkthrough of how to fix repeated Authentication failed errors in TortoiseGit by clearing saved authentication data via Clear in Saved Data. Covers cleaning up the Windows Credential Manager, checking credential.helper, preparing a PAT, and switching to SSH.

Overview
Sometimes authentication keeps failing even after the Git server address has changed or the account has been switched.
The cause is that TortoiseGit stores the previous authentication data in Windows credentials or its own repository.
This post summarizes how to clear the saved authentication data in TortoiseGit.
Symptoms
- The
Authentication failederror keeps occurring - Even though the account for the same repository has changed, TortoiseGit keeps trying to authenticate with the old account
Cause
- The Git server was switched from GitHub to GitLab
- The HTTP(S) URL or the username has changed
Solution
Clearing Authentication Data in TortoiseGit
The procedure below clears the saved authentication data so that the login prompt appears again on the next Pull or Push.
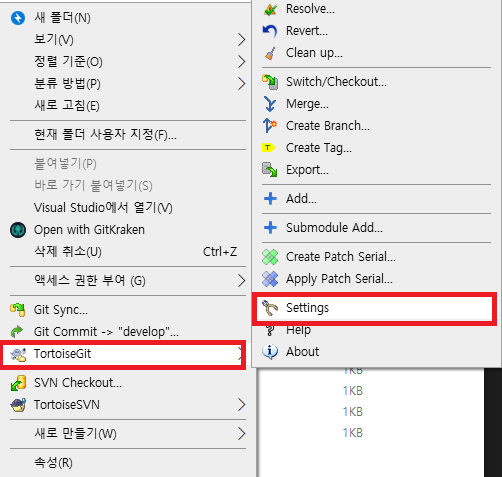
In Windows Explorer, navigate to your Git working folder.
Right-click inside the folder.
Go to TortoiseGit → Settings.
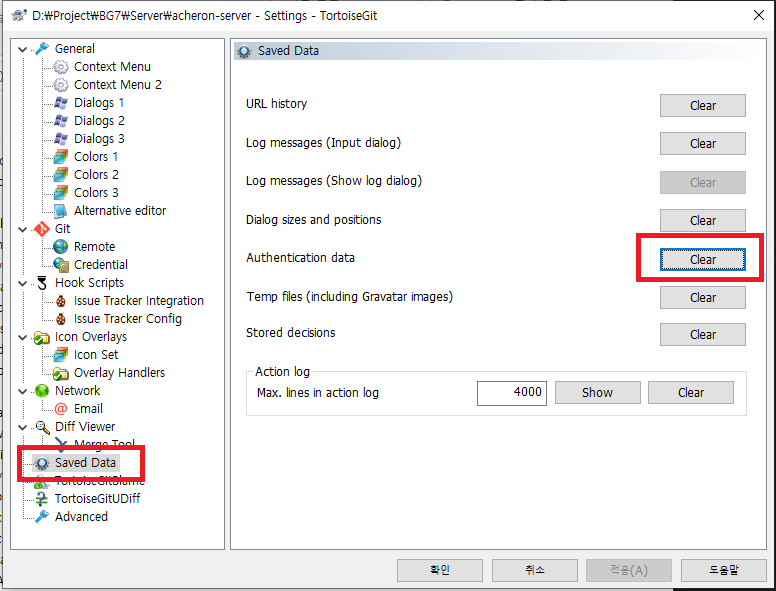
In the left-hand menu, select Saved Data.
In the Authentication data section, click Clear.
This deletes the previously saved authentication data.
Run
PullorPushagain.Re-enter your ID and password, or your token.
Note
GitLab usually uses a Personal Access Token instead of a password.
If you have 2FA enabled, prepare your token beforehand and enter it.


Checks If It Isn’t Being Cleared
- If multiple repository URLs are saved, authentication data for other URLs may still remain.
- Related entries may also remain in the Windows Credential Manager.
- In Control Panel, check for Git-related entries under Credential Manager → Windows Credentials.
Clearing Directly from the Windows Credential Manager
Authentication data that isn’t cleared by TortoiseGit’s Clear is often stored separately by Windows.
- Go to Control Panel → User Accounts → Credential Manager.
- Select the Windows Credentials tab.
- Look for entries starting with
git:, such asgit:https://github.comorgit:https://gitlab.com. - Expand the entry and click Remove.
If you’d like to check via a command first, use the following.
1cmdkey /list | findstr git
Checking Which Credential Helper Is Being Used
The entity that actually holds the authentication data is the credential helper configured in Git. If you don’t know where it’s stored, you’ll keep clearing the wrong place, so check the setting first.
1git config --show-origin --get credential.helper
manager: Managed by Git Credential Manager. Since it shows its own account selection window, you should check it together with the Windows Credentials.wincred: Stored in the Windows Credential Manager.- If the value is empty, nothing is stored and you’ll be prompted every time.
To clear the credentials for a specific host only, run the following.
1printf "protocol=https\nhost=github.com\n\n" | git credential reject
Preparing New Values to Enter
For security, both GitHub and GitLab use tokens instead of account passwords. If you issue one in advance before clearing, you can enter it right away when the authentication prompt appears.
- GitHub: Settings → Developer settings → Personal access tokens
- GitLab: User Settings → Access Tokens
To clone and push, grant read and write permissions on the repository. It’s safer not to grant broader permissions than necessary.
If It Keeps Recurring, Consider Switching to SSH
If you keep having to fix HTTP(S) authentication data, you can switch the remote address to SSH instead. Once you register a key, you’re free from token expiration or credential cache issues.
1# Check the current remote address
2git remote -v
3
4# Change to an SSH address
5git remote set-url origin [email protected]:{account-name}/{repository-name}.git
For the key generation and registration procedure, see the post Accessing a Remote Repository with a Git SSH Key: From Key Generation to Registration.